Introduction
Welcome! Before we dive into the world of Git and GitHub, let’s clarify something: although they’re often mentioned together, Git and GitHub are two very different things.
Git is a version control system created by the legendary Linus Torvalds — the same genius behind the Linux kernel. It allows developers to track and manage changes in code over time, making collaboration easier and more efficient.
GitHub, on the other hand, is a cloud-based hosting service for Git repositories. It allows developers to store their code remotely, collaborate with others, and take advantage of features like pull requests, issues, and CI/CD pipelines. Other similar platforms include GitLab, Bitbucket, and SourceForge.
In this post, we’ll cover the essentials of Git and dive into some advanced topics to make you a Git pro. You’ll learn:
- What a repository is and the difference between local and remote repositories
- How to work with pull requests and pushes to manage code changes
- The basics of staging, stashing, and other useful Git commands
By the end of this guide, you’ll have a strong understanding of how Git works and how to use GitHub to collaborate with others efficiently.

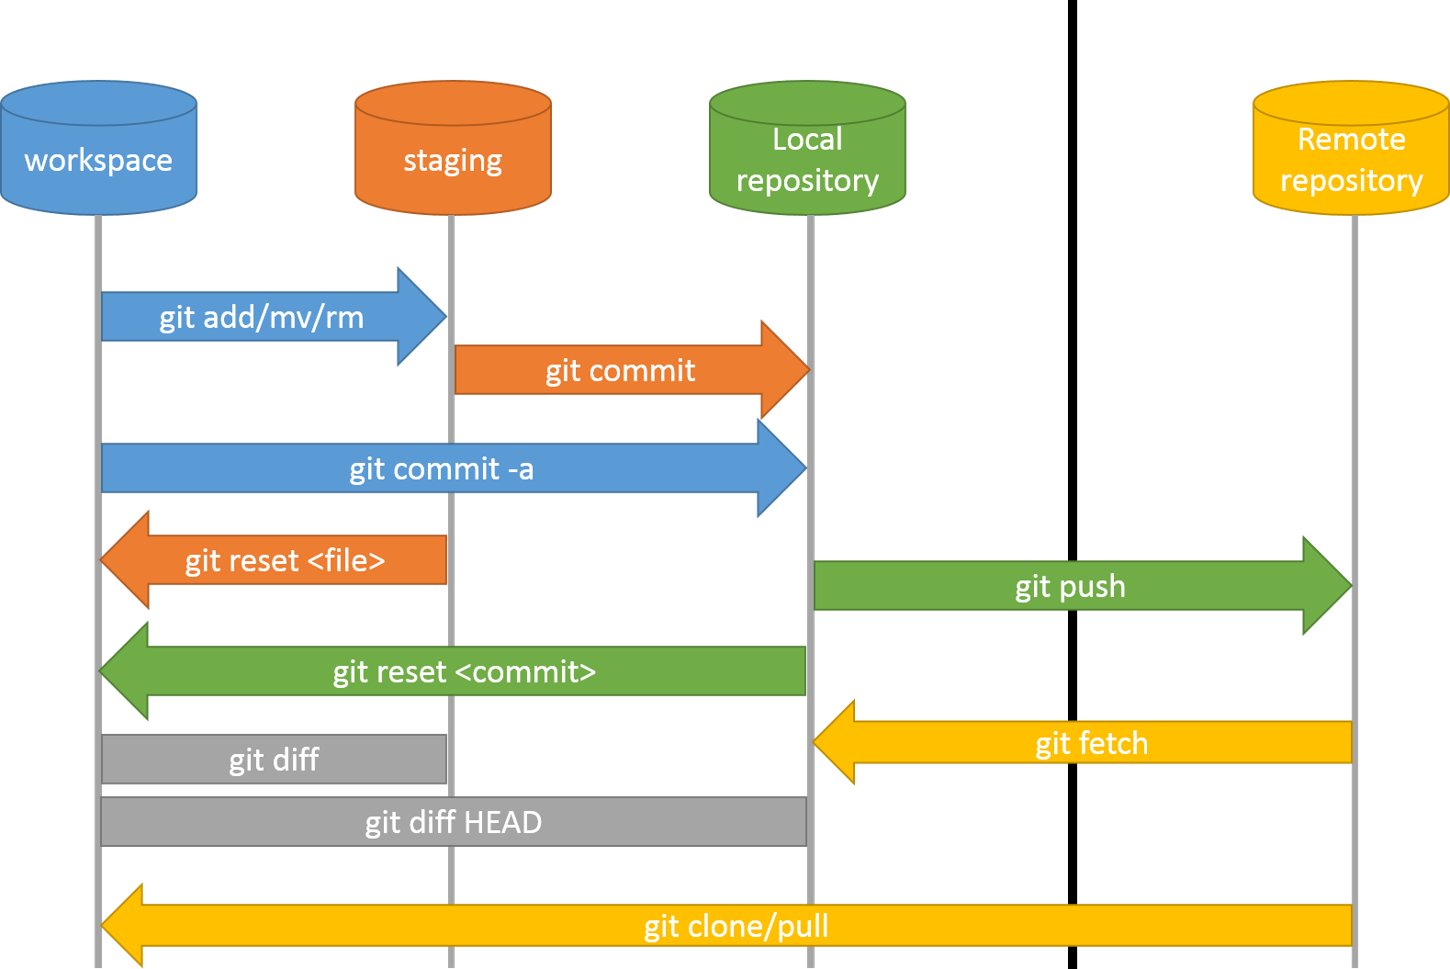
Git Workflow
The diagram above shows the Git workflow, which may seem intimidating at first. But don’t worry — we’ll break it down and cover each part in depth, step by step.
What is a Repository?
Before diving into the Git workflow, let’s first understand what a repository (or repo) is. In simple terms, a repository is just a place where you store all of your project files and track their changes over time. You can think of it as a folder or directory that contains not just your project files, but also the history of all the changes made to them. Repositories can be local (on your computer) or remote (hosted on platforms like GitHub or GitLab).
High-Level Git Workflow
At a high level, Git revolves around three primary areas in your local project workflow:
Working Directory: This is where you actually work on your project files. It’s the folder on your computer where you edit and create files, such as style.css, index.html, or any other project files.
Staging Area (Index): Before committing any changes, you need to add them to the staging area. This is like a preview of what changes will be included in the next commit. You can think of it as a “to-do list” of changes that you want Git to track.
Local Repository: This is where Git permanently stores all the commits (versions) of your project. When you commit your changes, they move from the staging area to the local repository, where Git tracks all your project’s history.
Each of these areas plays a crucial role in the Git workflow, and understanding how they interact will help you manage your code more effectively.
Creating a Git Repo and Making Commits
Before we begin, you need to install and set up Git on your system. I recommend following the GitHub Docs for that.
Initialize a Local Git Repository
Now that we’ve learned about the Git workflow, let’s create a Git repository on our local machine.
First, create a folder (directory) for your repository:
$ mkdir gitrepo && cd gitrepo
Next, let’s check the status of the directory:
$ git status

While this step isn’t strictly necessary, it’s a good habit to run git status early on. You should see an error message saying that this is not a git repository because we haven’t initialized the repo yet.
As you can see, Git is telling you that there is no repository here. This means that we haven’t yet initialized our repository in this folder.
Now, let’s initialize the repository using the following command:
$ git init
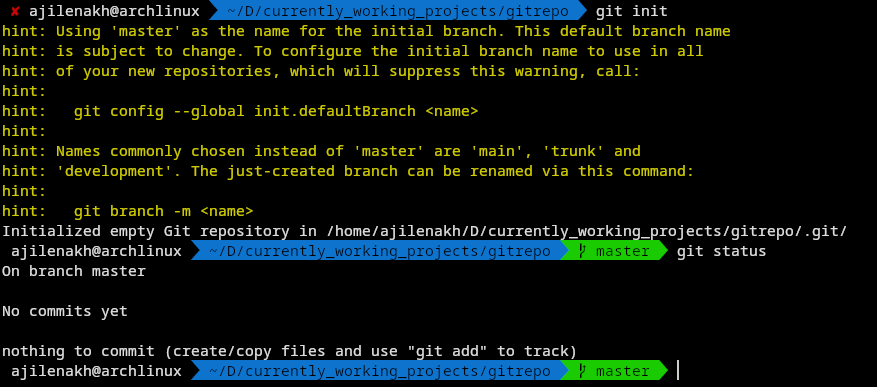 You might notice a warning about the default branch name. This is because some communities prefer using main instead of master for the default branch due to historical context. You can choose to use main or keep master as your default branch. It’s up to you.
After running git init, if you check the status again with git status, it should now show you’re on the master branch, and there will be nothing to commit yet.
Make a commit
Let’s create a file to make our first commit. For example, create a file called text.md:
touch text.md
and also check the status:
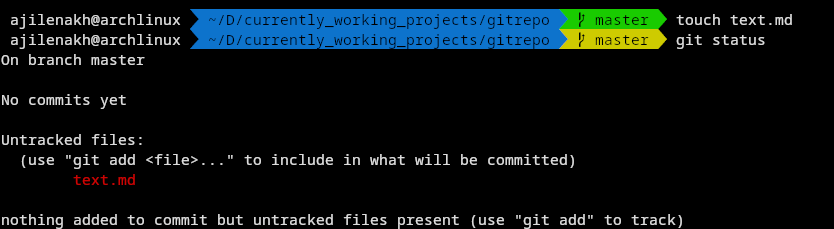
As you can see, Git tells us that text.md is untracked, meaning it exists in the working directory but is not yet part of the repository.
Staging and Commit
To add text.md to the repository, we first need to stage it using the following command:
git add text.md
Now, let’s commit the changes to the local repositoy:
git commit -m "Add text.md"

Congrats!! We’ve made our first commit! But wait, what is this master, root-commit, and the random-looking commit hash? Don’t worry about the output just yet — let’s break it down step by step.
[master (root-commit) 76c2a29] add text.md: This shows the branch (master) and the unique commit hash (76c2a29) for this particular commit. Since it’s the first commit, it’s called a root-commit.1 file changed, 0 insertions(+), 0 deletions(-): This tells you that 1 file (text.md) was changed (added), but no lines of code were inserted or deleted, as the file was newly created.create mode 100644 text.md: This shows the file’s permissions (100644), indicating it’s a regular file that is readable and writable by the owner and readable by others. The word create mode indicates that the file is newly created and added to the repository.
After the commit, if you run git status, it will show you that there is nothing to commit and your working directory is clean, meaning the repository is up-to-date with the files in the working directory.
we will read after git commit messages later
now if we do git status again we can see

Branches
Now that you’re familiar with making commits, it’s time to explore another powerful feature of Git: branches. In this section, we’ll dive into what branches are, why they’re essential, and how to use them effectively.
What Are Branches?
In Git, a branch is like a separate line of development for your codebase. It allows you to work on new features or fix bugs without affecting the main code that’s currently being used (i.e., the “master” branch). Think of it as creating a temporary copy of your project where you can experiment and make changes without worrying about breaking anything.
Why Are Branches Essential?
Branching is crucial in Git because it enables:
Feature development: Create a new branch for each feature or bug fix, allowing you to work on separate tasks independently.
Experimentation: Try out new ideas or approaches without affecting the main codebase.
Version control: Keep track of changes and maintain a record of all modifications made during the development process.
Using branches
We have learn the therotical part of the branches and how awsome they are now lets implement them follow along:
- First we will do is check how man branches there are by running the command
git branch
Assuming u are following the guide then u will see that is only one branch and it will be shown like this *master or *main cuz we have not creadted any bracnhes yet, the *is always on the active branch
- Lets make a branch named feature, u can use different commands to make a git branch, none of them right or wrong way of making branches. lets use two different commands to make two branches
git branch feature
git checkout -b bug-fix
After running the command git branch again, you’ll notice that there are now three branches, and you’re currently on the bug-fix branch.
This is because we used the git checkout (or git switch) command to switch branches. Additionally, when you use the -b argument with git checkout (i.e., git checkout -b branch-name), it not only creates a new branch but also switches to it immediately.
Merging branches
When you complete your work on a branches(edit the content in the branch), you might want to incorporate its changes into another branch (e.g., merging feature into master). To do this:
First switch to the branch you want to merge into. for examle:
git checkout master
Then, use the git merge command to merge the desired branch:
git merge feature
Git will apply the changes from feature to master. If there are no conflicts, the process will complete smooothly, and git will generate a commit for the merge.
Resolving Merge Conflicts
Sometimes, when merging beanches, you might encounter merge conflicts. This happens when changes in two branches overlap or conflict with each other. Git will notify you about the files with conflicts and pause the merge until you resolve them.
To resolve merge conflict:
- open the conflictiong files and look for conflict maekes like this:
<<<<<<< HEAD Code from the current branch ======= Code from the branch being merged >>>>>>> feature - Edit thefile to keep the desired changes and remove the conflict markers.
- once resolved, stage the changes:
git add filename - complete the merge by committing:
git commit
Deleting a branches
After merging a branch and confirming that it is no longer needed, you can delete it to keep your repository clean. To delete a branch:
Loaclly:
git branch -d featureIf the brnah hasn’t been merged yet and you still want to delete it, use -D(force delete):
git branch -D featureRemotely(on GitHub):
git push origin --delete feature**
NEW CONTENT SOON**