Why?
While building my 3-tier AWS architecture, I encountered a challenge related to accessing resources within my private VPC. Here’s the setup:
I have two VPCs:
- Public VPC: This houses my Bastion host, which acts as the secure entry point to my network.
- Private VPC: This VPC is completely isolated, containing my Nginx servers, application servers, and databases—no public access at all. There’s only a single load balancer that routes traffic to the Nginx servers, and a NAT instance for internet access (still working on this, as I want to avoid the higher cost of a NAT gateway).
The problem is that, in the future, if I need to access services like Bitbucket, SonarQube, or any internal resources in the private VPC, I wouldn’t be able to do so easily. Since my private VPC resources don’t have public IPs and are completely isolated, direct access to them from my local machine or external network isn’t possible.
That’s when the idea clicked: Why not turn my Bastion host into a VPN gateway? This would allow me to securely access my private VPC from anywhere without exposing any resources directly to the public internet. Using a VPN, I can route my traffic through the Bastion host and access all my private resources—like Bitbucket and SonarQube—safely and securely.
How to turn your EC2 instance into a vpn server?
First we need to make a security group and add these inbound rules:
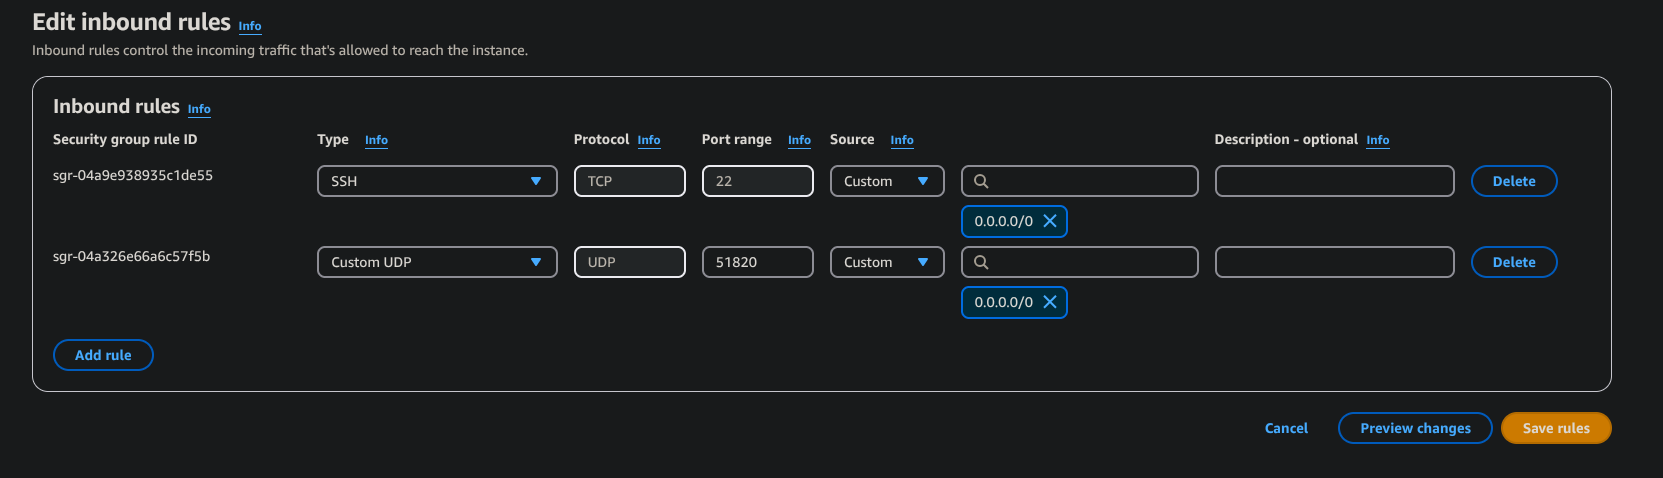
- add a rule to open the port 51820 UDP & also open the port 22 for ssh
- make the source public (e.g. 0.0.0.0)
After which we will start an EC2 instance and add the secutrity group on to it
- Launch an Amazon linux 2023 (it will work on almost any linux server)
- Install wireguard on the linux server you are using, for amazon linux we can use this command:
$ sudo dnf install wiregaurd-tool
Now lets Setup the wireguard server
- Frist create a wireguard directory if already not created:
$ sudo mkdir /etc/wireguard/
- Alright now lets generate a pair of key using
wg genkey:
$ wg genkey | sudo tee /etc/wireguard/privatekey | wg pubkey | sudo tee /etc/wireguard/publickey
WireGuard uses asymmetric encryption, which relies on a pair of mathematically linked keys: a public key and a private key.
- Private Key: You keep this secure and never share it.
- Public Key: You share this with others.
Data encrypted with your private key can only be decrypted with your public key, ensuring authenticity. Importantly, your private key cannot be derived from your public key, maintaining security. This ensures secure communication without exposing sensitive information.
- Now lets create and edit the wiregurad config file(use any text editor of your choise):
$ sudo vim /etc/wireguard/wg0.conf
And add this to the wg0.conf
[Interface]
Address = 11.0.0.1/24
SaveConfig = true
PostUp = iptables -A FORWARD -i %i -j ACCEPT; iptables -t nat -A POSTROUTING -o (network_interface) -j MASQUERADE
PostDown = iptables -D FORWARD -i %i -j ACCEPT; iptables -t nat -D POSTROUTING
ListenPort = 51820
PrivateKey = (PRIVATE_KEY)
Important we can see our network intrface using
$ ip -c a
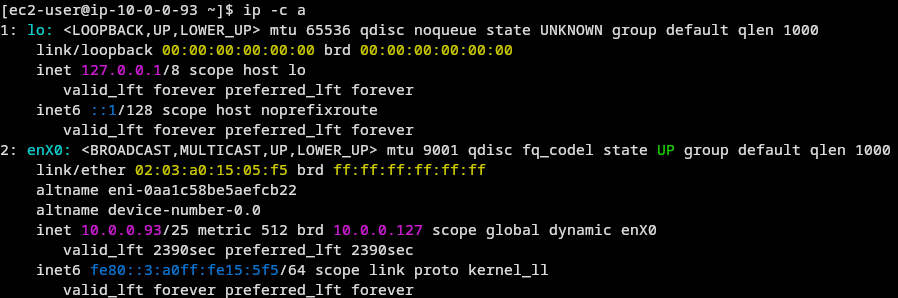
Here as u can see the my network interface is enX0 in place of (network_interface) i will place enX0 (e.g....-o enX0 -j MASQ....)
We can get your privatekey using the cat command:
$ sudo cat /etc/wireguard/privatekey
- Lets start the wireguard service
We can start the wireguard service after configuration is complete:
$ sudo systemctl enable wg-quick@wg0
$ sudo systemctl start wg-quick@wg0
- Enable IP Forwarding: To enable traffic routing through the VPN, you must enable IP forwarding. Use the following commands to achieve this:
$ echo "net.ipv4.ip_forward = 1" | sudo tee -a /etc/sysctl.conf
$ sudo sysctl -p
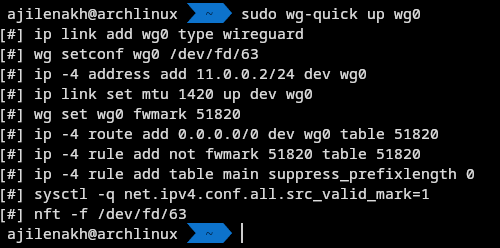
- lets start the wg0 network interface using the folloing command:
$ sudo wg-quick up wg0
- We are almost done setting up the server side of configuration let me quickely explain the config:
Address = 11.0.0.1/24: This sets the IP address of the server within the VPN network. 11.0.0.1/24 is the private IP address that will be assigned to the WireGuard interface on the server. You can adjust this range depending on your network setup, but for simplicity, this is often a common private network address.SaveConfig = true: This setting ensures that the server’s configuration is saved after the server is stopped or restarted, which means any changes to the configuration are retained.PostUp: These are commands that will run once the WireGuard server is started. In this case:iptables -A FORWARD -i %i -j ACCEPT: This allows forwarding of traffic from the WireGuard interface (represented by %i).iptables -t nat -A POSTROUTING -o (network_interface) -j MASQUERADE: This sets up NAT (Network Address Translation), so that the server will masquerade (i.e., act as the source of) traffic that goes out from the VPN network to the public internet. This step ensures that outgoing traffic from the VPN can access the internet.
PostDown: These are commands that will run once the WireGuard interface is stopped. These commands remove the rules set up during PostUp to ensure that the server’s firewall is clean when WireGuard is not running.ListenPort = 51820: This specifies the port on which the WireGuard server will listen for incoming connections from clients. You can choose a custom port, but 51820 is the default port for WireGuard.
After this we can start confugring the client:
- Frist create a wireguard directory if already not created:
$ sudo mkdir /etc/wireguard/
- Generate a pair of key using
wg genkey:
$ wg genkey | sudo tee /etc/wireguard/privatekey | wg pubkey | sudo tee /etc/wireguard/publickey
- Create and edit the wiregurad config file:
$ sudo vim /etc/wireguard/wg0.conf
Add the following configuration:
[Interface]
PrivateKey = privatekey_client
Address = 11.0.0.2/24

[Peer]
PublicKey = publickey_server
Endpoint = ipaddress_server:51820
AllowedIPs = 0.0.0.0/0
Breakdown of the config:
Interface: This section configures the client’s local settings.
PrivateKey = privatekey_client: This is the private key for the client. It’s unique to the client and used to authenticate the client to the server.Address = 11.0.0.2/24: This sets the client’s IP address within the VPN network. The 11.0.0.2 address should be unique within the VPN range, and /24 indicates the subnet mask (the client will have access to all IPs in the 11.0.0.0/24 range).
Peer: This section configures the server information for the client.
PublicKey = publickey_server: This is the server’s public key, which is used by the client to securely connect to the server. The server’s public key is shared by the server, but never the private key.Endpoint = ipaddress_server:51820: This is the server’s IP address and port that the client will connect to. It’s the location where the client will reach out to establish the VPN connection. Replace ipaddress_server with the actual IP address of your WireGuard server.AllowedIPs = 0.0.0.0/0: This means all traffic (internet and internal) from the client will go through the WireGuard tunnel to the server. It’s saying, “Route everything through the VPN.”
Lets connect to Our VPN server
- To be able to connect to he wireguard server we must fist add our publickey to the wireguard server, using the following command:
$ sudo wg set wg0 peer clientpublickey allowed-ips 11.0.0.2
- we are done now lest connect hurray!!
$ sudo wg-quick up wg0
- Once connected, you can verify the VPN by pinging a private EC2 instance within our VPC or by checking our public IP address.
Conclusion
By setting up WireGuard on your Bastion host, you can securely access private resources in your AWS VPC from anywhere. This solution is cost-effective, secure, and easy to maintain
Additional Tips
Use strong key management to protect your private keys.
Regularly update your WireGuard server and client software.
Consider restricting the VPN to specific IP ranges for enhanced security.